
Photo Credit - Matt Addington
Getting off the ground with a new system can be challenging. You’ve got the initial capital expense just in equipment, and a steep learning curve ahead regarding the use of it. When it comes to running leadcore line for walleyes however, both the cost and effort to get better at it are justified expenses. With leadcore trolling being a technique a great lakes charter captain would more likely deploy than a land-locked lakes angler, there’s a bit of an intimidation factor. That’s probably why I field more questions on leadcore than any other subject during the summer months. Rest assured, though it may seem tricky at first, it very quickly becomes old hat and something you wished you’d have tried sooner.
As walleyes move progressively deeper throughout the summer months, having a strong leadcore game in your arsenal can be one of the best ways to continue getting bit well into the August doldrums. No matter what part of the water column your ‘eyes are in, the idea behind leadcore is that a length of lead weight running through the center sleeve of a braided line can help sink any offering pulled behind it down and into the fish’s zone.
More than just a search tool, it can be an effective way to target fish spread out along a long break or large structural element. When pulling live-bait rigs and even spinners takes too long between pods of fish, and a healthy dose of concentration is needed in big-water, leadcore allows you to put rods in holders and ride out swells while putting fish in the boat at the same time.
Leadcore is far from a big-water-only pattern either, as Mille Lacs guide and walleye-guru Brad Hawthorne will tell you, it works on smaller lakes just the same. He recently took 4th place at the Camp Confidence Tournament on Gull Lake, a water-body he’s only fished a handful of times in the fall, by pulling his Mille Lacs-ready leadcore setups out of his rod storage and slapping them into holders. “We smacked a 23 (inch walleye) right away, then another mid-20’s fish, and continued to put ‘eyes in the boat on a long stretch of break that people were lining up on to live-bait rig.”
Personally, I’ve pulled walleyes out of lakes far smaller than Gull using leadcore, even at night for clear water bodies. The point is that it flat-works, but how to get started? You may have heard that it can be finicky, knot easily, while having the tendency to run together and tangle all the baits in your spread. While there is some truth to that statement, the benefits far outweigh any negatives, and getting off the ground with this technique will prove it to you.
The Setup – The cornerstone of every good leadcore program is a Medium to Medium Heavy, Moderate Action trolling rod, paired with a slightly oversized line-counter reel, and a spool of leadcore line. You can easily spend well over $200 per combo, but you don’t need to, especially if you’re unsure how much leadcore trolling you’ll be doing. Buy two combos at a time, so you can spool up the same way, with the same amount of line, on the same rod/reel. Learning one system will make it less confusing.
The Line - Big boxes and small tackle shops alike make it easy these days by helping you both with the purchase, and by spooling up for you. Start with a reputable #18lb leadcore line, and for those looking to up their game, consider the Sufix Advanced leadcore. Standard leadcore dives on average 5-feet per color, with the Advanced leadcore diving to 7-feet per color. The result is more depth per less units of line, but either way, consider putting on a full-core. Leadcore line is marked by a different color every 10 yards, so a full-core would be 10-colors, or 100 yards. You will likely not need to dive to this depth, but it’s a good starting place to get you acquainted with the method. Start by filling the reel first with some backing, which can be braid or mono, though mono is cheaper. The amount is variable, so it’s often best to fill one reel backwards starting with leadcore, then backing until full, then fill the empty reel from the full one noting on your linecounter how much backing was used. Fill the original, and now empty reel with the same amount of backing, then secure the leadcore for two full reels that are the same.
The Leader – On the end of your leadcore goes a leader of varying length and material. On Lake Pepin, or other areas where I’m trolling hard substrate with zebra mussels, I run a 3-5 foot section of braided leader, then a snap, then my lure. On ultra-clear water bodies like Mille Lacs, I run a 30 foot leader of 10# Fluorocarbon to keep my offering less visible. Unsheath the end of your leadcore, and pull out 6 inches or so of the lead. Pull the sheath back down and use it to tie an applicable braid to mono, or braid to braid knot.
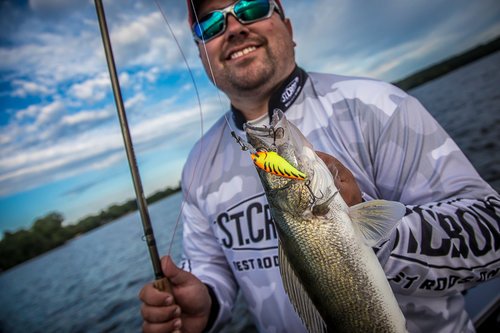
The Lures – Any crankbait runs well with this scenario, as do spinners and a variety of other lures designed to be pulled.
Putting It Into Action – Start by letting out a few colors of line while going 2.2-3.0mph. Let out line evenly to prevent overruns and do your best to keep kinks and tangles to a minimum. When leadcore knots, the interior lead can break and poke out in places. These fractures make everything more difficult, so avoid them by dropping line back slowly and evenly. Deep diving crankbaits should be let out until you’re reliably making contact with bottom occasionally. You don’t want to be digging in constantly, as this causes baits to wander then tangle. Pull along gradually similar depths, and as you get better at both reeling in line and letting it out to trace bottom, work your way towards pulling it along breaks.
When employed in this manner, leadcore is a great tactic for getting crankbaits near bottom. Through experience, you can learn to do this well, and cover the bulk of advantageous leadcore trolling situations. That said, there’s even more we can do with leadcore to cover all kinds of bases. Stay tuned, as advanced leadcore tactics will be the subject of next week’s article.
